
System-Level Runner Integration
Overview
System administrators can add machines in the Admin Management Platform as Runners for Cloud Native Build/Workspaces functionality, available for users.
CNB supports Linux, Mac, and Windows build machines.
Two Hosting Modes
For specific usage, see Admin Configuration and Runner Configuration.
System Hosting (Default)
Machines managed by the CNB platform require mutual access between the machine and the platform. Added via ip:port.
Self-Hosting
Machines managed by users themselves only require direct access to the CNB platform. Added via a unique identifier.
Who Can Add Runners
- System administrators: add Runners under
Admin Console / System Management / Cloud Native Build / Runner Managementto provide platform-wide build capacity. - Root-organization administrators (optional): once the system administrator enables the
Allow Custom Runnerstoggle, root-organization administrators can self-attach Mac/Windows build machines underOrganization Settings / Build Nodesfor use within that organization only. See Root-Organization Custom Runners below.
System Environment Requirements
Linux Build Machines
- TencentOS 3.2 / TencentOS 3.1 / CentOS 8 and derivatives
- Kernel version 5.4+ recommended
- docker >= 26.1.5
- Ports 8087 and 8088 must be available and allowed for local listening
Mac Build Machines
- git >= 2.43.0
- Ports 8087 and 8088 must be available and allowed for local listening
Since Mac does not support OverlayFS, second-read cloning will degrade to normal cloning.
Windows Build Machines
- Recommended Windows 10 or above
- git >= 2.43.0
- Ports 8087 and 8088 must be available and allowed for local listening
Since Windows does not support OverlayFS, second-read cloning will degrade to normal cloning.
Configuration Process
1. Configure Linux Build Machines (Standard Solution)
a-sysctl.sh
b-raid0.sh
c-daemon-json.sh
d-install-docker.sh
e-install-runner-config.sh
f-install-runner.sh
g-install-binfmt.sh
h-install-docker-plugin.sh
i-install-clean-cgroup.sh
#!/bin/bash
# =============================================================================
# Script:     a-sysctl.sh
# Description: 安装依赖并配置内核参数(转发、inotify、IPv6 等)
#              Install dependencies and configure kernel parameters (forwarding,
#              inotify, IPv6, etc.)
# Note:       自动适配 dnf / yum / apt-get 包管理器
#             Automatically adapts to dnf / yum / apt-get package managers
#             配置方式为幂等:已存在的参数会更新值,不存在的会追加
#             Idempotent configuration: existing parameters are updated, new
#             ones are appended
# =============================================================================

set -eo pipefail

# Install dependencies based on package manager / 根据包管理器安装依赖
if command -v dnf &>/dev/null; then
    dnf -y install lvm2 libcgroup-tools
elif command -v yum &>/dev/null; then
    yum -y install lvm2 libcgroup-tools
elif command -v apt-get &>/dev/null; then
    apt-get -y install lvm2 cgroup-tools
else
    echo "Unsupported package manager / 不支持的包管理器" >&2
    exit 1
fi

# -----------------------------------------------------------------------------
# Configure sysctl parameter: update if exists, append if not
# 配置 sysctl 参数:已存在则更新值,不存在则追加
# Usage / 用法: configure_sysctl "parameter" "value"
# -----------------------------------------------------------------------------
configure_sysctl() {
    local param="$1"
    local value="$2"
    local conf_file="/etc/sysctl.conf"

    if grep -q "^${param}\s*=" "$conf_file" 2>/dev/null; then
        sed -i "s|^${param}\s*=.*|${param} = ${value}|" "$conf_file"
    else
        echo "${param} = ${value}" >> "$conf_file"
    fi
}

# -----------------------------------------------------------------------------
# Configure kernel parameters / 配置内核参数
# -----------------------------------------------------------------------------
# Container runtime optimizations / 容器运行时优化
configure_sysctl "net.ipv4.ip_forward" "1"
configure_sysctl "fs.inotify.max_user_instances" "10000"
configure_sysctl "fs.inotify.max_user_watches" "1600000"
configure_sysctl "net.core.netdev_max_backlog" "65536"
configure_sysctl "kernel.keys.maxkeys" "20000"
configure_sysctl "kernel.keys.maxbytes" "500000"

# Apply configuration / 应用配置
sysctl -p#!/bin/bash
# =============================================================================
# Script: b-raid0.sh
# Description: 检测数据盘并配置挂载:单盘直接格式化挂载,多盘创建 RAID0
# Detect data disks and configure mounting: single disk is directly
# formatted and mounted, multiple disks create RAID0
# Note: 系统盘通过 df / 自动识别并排除
# System disk is automatically identified and excluded via df /
# 数据盘统一挂载到 /data,使用 XFS 文件系统(ftype=1)
# Data disks are uniformly mounted to /data using XFS filesystem
# (ftype=1)
# 多盘时自动处理已有的 /dev/md0 或 /dev/md127
# Automatically handles existing /dev/md0 or /dev/md127 for
# multiple disks
# 需要提前安装 mdadm 工具
# Requires mdadm to be installed beforehand
# =============================================================================
set -eo pipefail
# -----------------------------------------------------------------------------
# Constants / 常量
# -----------------------------------------------------------------------------
MOUNT_POINT="/data"
RAID_DEVICE="/dev/md0"
FS_TYPE="xfs"
MOUNT_OPTS="defaults,pquota"
# 检测系统盘并排除,获取数据盘列表 / Detect system disk and exclude, get data disk list
SYSTEM_DISK=$(echo "/dev/$(lsblk -no pkname $(findmnt -no SOURCE /))")
DATA_DISKS=$(lsblk -d -o NAME,TYPE | awk '/disk/ {print "/dev/"$1}' | grep -v "$SYSTEM_DISK" | grep -v "/dev/md")
DATA_DISK_COUNT=$(echo "$DATA_DISKS" | grep -c . || true)
# -----------------------------------------------------------------------------
# format_and_mount: 格式化设备并挂载到 /data,同时更新 fstab
# Format device and mount to /data, also update fstab
# $1 - 设备路径,如 /dev/sdb 或 /dev/md0 / Device path, e.g. /dev/sdb or /dev/md0
# -----------------------------------------------------------------------------
format_and_mount() {
local device="$1"
if ! mountpoint -q "$MOUNT_POINT"; then
echo "mount $device to $MOUNT_POINT"
mkfs.xfs -f -n ftype=1 "$device"
mkdir -p "$MOUNT_POINT"
mount -o "$MOUNT_OPTS" "$device" "$MOUNT_POINT"
else
echo "$MOUNT_POINT is already mounted"
fi
# 更新 fstab:移除该设备旧的 UUID 记录,追加新记录
# Update fstab: remove old UUID records for the device, append new record
local uuid
uuid=$(blkid -s UUID -o value "$device")
grep -v "$uuid" /etc/fstab > /etc/fstab.tmp || true
echo "UUID=$uuid $MOUNT_POINT $FS_TYPE $MOUNT_OPTS 0 0" >> /etc/fstab.tmp
mv /etc/fstab.tmp /etc/fstab
}
# -----------------------------------------------------------------------------
# 单盘模式:直接格式化数据盘并挂载 / Single disk mode: directly format and mount
# -----------------------------------------------------------------------------
if [[ "$DATA_DISK_COUNT" -eq 1 ]]; then
echo "数据盘数量等于 1 / Data disk count is 1"
format_and_mount "$DATA_DISKS"
df -Th
# -----------------------------------------------------------------------------
# RAID0 (multiple disks) / RAID0(多盘模式)
# -----------------------------------------------------------------------------
elif [[ "$DATA_DISK_COUNT" -gt 1 ]]; then
echo "数据盘数量大于 1 / Data disk count is greater than 1"
if fdisk -l 2>/dev/null | grep -q '/dev/md0'; then
echo "/dev/md0 已存在 / /dev/md0 already exists"
elif fdisk -l 2>/dev/null | grep -q '/dev/md127'; then
echo "发现 /dev/md127,迁移为 /dev/md0 / Found /dev/md127, migrating to /dev/md0"
mdadm --stop /dev/md127
mdadm --assemble "$RAID_DEVICE" --name=0 --update=name $DATA_DISKS
mdadm --detail --scan > /etc/mdadm.conf
else
echo "/dev/md0 不存在,进行初始化 / /dev/md0 does not exist, initializing"
yes | mdadm -C -a yes "$RAID_DEVICE" -l 0 -n "$DATA_DISK_COUNT" $DATA_DISKS
mdadm -D "$RAID_DEVICE"
mkfs.xfs -f -n ftype=1 "$RAID_DEVICE"
mdadm --detail --scan > /etc/mdadm.conf
fi
mkdir -p "$MOUNT_POINT"
format_and_mount "$RAID_DEVICE"
cat /etc/fstab
df -Th
# -----------------------------------------------------------------------------
# No data disks / 无数据盘
# -----------------------------------------------------------------------------
else
echo "数据盘小于1,不进行任何磁盘操作 / Data disk count less than 1, no disk operations performed"
fi#!/bin/bash
# =============================================================================
# Script: c-daemon-json.sh
# Description: 配置 Docker daemon.json(数据目录、镜像加速、buildkit 等)
# Configure Docker daemon.json (data directory, registry mirror,
# buildkit, etc.)
# Note: Docker 数据目录设置为 /data/docker,需要先完成磁盘挂载
# Docker data directory is set to /data/docker, disk mounting must
# be completed first
# 镜像加速使用腾讯云内网地址,仅适用于腾讯云 CVM
# Registry mirror uses Tencent Cloud internal address, only
# applicable to Tencent Cloud CVM
# =============================================================================
set -eo pipefail
mkdir -p /etc/docker
cat>/etc/docker/daemon.json<<EOF
{
"default-address-pools": [
{
"base": "172.17.0.0/12",
"size": 24
}
],
"data-root": "/data/docker",
"registry-mirrors": ["https://mirror.ccs.tencentyun.com"],
"features": {
"buildkit": true
}
}
EOF
#cat> /etc/docker/daemon.json <<EOF
#{
# "debug": true,
# "data-root": "/data/docker",
# "registry-mirrors": ["https://mirror.ccs.tencentyun.com"],
# "features": {
# "buildkit": true
# },
# "metrics-addr": "$(ip route get 1 | awk '{print $7; exit}'):9323",
# "icc": false,
# "bip": "172.17.0.1/16"
#}
#EOF
cat /etc/docker/daemon.json#!/bin/bash
# =============================================================================
# Script: d-install-docker.sh
# Description: 下载并安装 Docker 二进制文件,配置 systemd 服务(docker、containerd)
# Download and install Docker binaries, configure systemd services
# (docker, containerd)
# Note: 自动从腾讯镜像下载 Docker tgz 包,无需预先下载到 files/ 目录
# Automatically downloads Docker tgz from Tencent mirror, no need to
# pre-download to files/ directory
# Docker 数据目录为 /data/docker,需要先完成磁盘挂载
# Docker data directory is /data/docker, disk mounting must be
# completed first
# 安装完成后会自动启用并启动 docker、docker.socket、containerd
# After installation, docker, docker.socket, and containerd are
# automatically enabled and started
# =============================================================================
set -eo pipefail
# -----------------------------------------------------------------------------
# Constants / 常量
# -----------------------------------------------------------------------------
SCRIPT_DIR="$(cd "$(dirname "$0")" && pwd)"
TARGET_DOCKER_VERSION="27.5.1"
SERVICE_DIR="/usr/lib/systemd/system"
ARCH="$(arch)"
# 下载目录 / Download directory
DOWNLOAD_DIR="${SCRIPT_DIR}/files"
mkdir -p "$DOWNLOAD_DIR"
# Docker 二进制包下载地址 / Docker binary package download URL
DOCKER_TGZ_URL="https://mirrors.cloud.tencent.com/docker-ce/linux/static/stable/${ARCH}/docker-${TARGET_DOCKER_VERSION}.tgz"
DOCKER_TGZ="${DOWNLOAD_DIR}/docker-${TARGET_DOCKER_VERSION}-${ARCH}.tgz"
# -----------------------------------------------------------------------------
# Download Docker binaries / 下载 Docker 二进制文件
# -----------------------------------------------------------------------------
echo "Downloading Docker ${TARGET_DOCKER_VERSION} for ${ARCH}..."
wget --show-progress -O "${DOCKER_TGZ}" "${DOCKER_TGZ_URL}"
# -----------------------------------------------------------------------------
# Stop existing Docker services / 停止现有 Docker 服务
# -----------------------------------------------------------------------------
systemctl stop docker docker.socket containerd 2>/dev/null || true
# -----------------------------------------------------------------------------
# Install Docker binaries / 安装 Docker 二进制文件
# -----------------------------------------------------------------------------
tar -xvf "${DOCKER_TGZ}" -C /root/
cp /root/docker/* /usr/bin/
# -----------------------------------------------------------------------------
# Write docker.service / 写入 docker.service
# -----------------------------------------------------------------------------
cat > "${SERVICE_DIR}/docker.service" << 'EOF'
[Unit]
Description=Docker Application Container Engine
Documentation=https://docs.docker.com
After=network-online.target docker.socket firewalld.service containerd.service time-set.target
Wants=network-online.target containerd.service
Requires=docker.socket
[Service]
Type=notify
EnvironmentFile=-/etc/sysconfig/docker
# the default is not to use systemd for cgroups because the delegate issues still
# exists and systemd currently does not support the cgroup feature set required
# for containers run by docker
ExecStart=/usr/bin/dockerd -H fd:// --containerd=/run/containerd/containerd.sock $OPTIONS
ExecReload=/bin/kill -s HUP $MAINPID
TimeoutStartSec=0
RestartSec=2
Restart=always
# Note that StartLimit* options were moved from "Service" to "Unit" in systemd 229.
# Both the old, and new location are accepted by systemd 229 and up, so using the old location
# to make them work for either version of systemd.
StartLimitBurst=3
# Note that StartLimitInterval was renamed to StartLimitIntervalSec in systemd 230.
# Both the old, and new name are accepted by systemd 230 and up, so using the old name to make
# this option work for either version of systemd.
StartLimitInterval=60s
# Having non-zero Limit*s causes performance problems due to accounting overhead
# in the kernel. We recommend using cgroups to do container-local accounting.
LimitNOFILE=infinity
LimitNPROC=infinity
LimitCORE=infinity
# Comment TasksMax if your systemd version does not support it.
# Only systemd 226 and above support this option.
TasksMax=infinity
# set delegate yes so that systemd does not reset the cgroups of docker containers
Delegate=yes
# kill only the docker process, not all processes in the cgroup
KillMode=process
OOMScoreAdjust=-500
[Install]
WantedBy=multi-user.target
EOF
# -----------------------------------------------------------------------------
# Write docker.socket / 写入 docker.socket
# -----------------------------------------------------------------------------
cat > "${SERVICE_DIR}/docker.socket" << 'EOF'
[Unit]
Description=Docker Socket for the API
[Socket]
ListenStream=/run/docker.sock
SocketMode=0660
SocketUser=root
SocketGroup=docker
[Install]
WantedBy=sockets.target
EOF
# -----------------------------------------------------------------------------
# Write containerd.service / 写入 containerd.service
# -----------------------------------------------------------------------------
cat > "${SERVICE_DIR}/containerd.service" << 'EOF'
[Unit]
Description=containerd container runtime
Documentation=https://containerd.io
After=network.target local-fs.target dbus.service
[Service]
ExecStartPre=-/sbin/modprobe overlay
ExecStart=/usr/bin/containerd
Type=notify
Delegate=yes
KillMode=process
Restart=always
RestartSec=5
LimitNPROC=infinity
LimitCORE=infinity
LimitNOFILE=infinity
TasksMax=infinity
OOMScoreAdjust=-999
[Install]
WantedBy=multi-user.target
EOF
# -----------------------------------------------------------------------------
# Enable and start services / 启用并启动服务
# -----------------------------------------------------------------------------
systemctl daemon-reload
systemctl enable docker docker.socket containerd
systemctl start docker docker.socket containerd
echo "Docker installed ($(arch)):"
echo "docker ps:"
docker ps#!/bin/bash
# 证书文件列表 / Certificate file list
CERTS=("orange-ca.pem" "orange-runner.crt" "orange-runner.key")
SCRIPT_DIR="$(cd "$(dirname "$0")" && pwd)"
CERTS_DIR="${SCRIPT_DIR}/files"
# 检查并复制证书文件 / Check and copy certificate files
for cert in "${CERTS[@]}"; do
if [[ ! -f "${CERTS_DIR}/${cert}" ]]; then
echo "错误: 证书文件不存在 / Error: Certificate file not found ${CERTS_DIR}/${cert}"
exit 1
fi
cp "${CERTS_DIR}/${cert}" /etc/orange-ci/
done
mkdir -p /etc/orange-ci
cat>/etc/orange-ci/runner-config.json<<EOF
{
"cpus": 64,
"defaultCpus": 8,
"memory": 128,
"useCgroupParent": true,
"quotaSize": {
"volume": "512G",
"container": "256G",
"workspace": "512G"
},
"xfsPath": "/data/orange-ci",
"maxWorkspacePerGit": 30,
"volumes": [
"/var/lib/lxcfs/proc/cpuinfo:/proc/cpuinfo",
"/var/lib/lxcfs/proc/diskstats:/proc/diskstats",
"/var/lib/lxcfs/proc/loadavg:/proc/loadavg",
"/var/lib/lxcfs/proc/meminfo:/proc/meminfo",
"/var/lib/lxcfs/proc/slabinfo:/proc/slabinfo",
"/var/lib/lxcfs/proc/stat:/proc/stat",
"/var/lib/lxcfs/proc/swaps:/proc/swaps",
"/var/lib/lxcfs/proc/uptime:/proc/uptime",
"/var/lib/lxcfs/sys/devices/system/cpu:/sys/devices/system/cpu"
],
"dockerArgsForDind": [
"-v /var/lib/lxcfs:/var/lib/lxcfs"
],
"networkIsolation": true
}
EOF
echo "/etc/orange-ci:"
ls -lh /etc/orange-ci#!/bin/bash
# =============================================================================
# Script: e-install-runner.sh
# Description: 使用 docker-compose 部署 Orange CI Runner 和 lxcfs 容器
# Deploy Orange CI Runner and lxcfs containers using docker-compose
# Note: 需要 Docker 和 docker-compose 插件已安装
# Requires Docker and docker-compose plugin to be installed
# compose 文件生成到 /opt/orange/docker-compose.yml
# Compose file is generated at /opt/orange/docker-compose.yml
# 可通过环境变量 RUNNER_VERSION 指定 Runner 版本(默认 latest)
# Runner version can be specified via RUNNER_VERSION env var
# (default: latest)
# =============================================================================
set -eo pipefail
# -----------------------------------------------------------------------------
# Constants / 常量
# -----------------------------------------------------------------------------
SCRIPT_DIR="$(cd "$(dirname "$0")" && pwd)"
COMPOSE_FILE="/opt/orange/docker-compose.yml"
COMPOSE_DIR="$(dirname "$COMPOSE_FILE")"
RUNNER_VERSION="${RUNNER_VERSION:-latest}"
# -----------------------------------------------------------------------------
# Write docker-compose.yml / 写入 docker-compose.yml
# -----------------------------------------------------------------------------
mkdir -p "$COMPOSE_DIR"
cat > "$COMPOSE_FILE" << EOF
services:
orange-runner:
image: cnbcool/orange-runner:${RUNNER_VERSION}
restart: always
network_mode: host
privileged: true
container_name: orange-runner
volumes:
- /dev:/dev
- /data/orange-ci:/data/orange-ci:rshared
- /etc/orange-ci:/etc/orange-ci
- /etc/docker:/etc/docker:ro
- /var/run/docker.sock:/var/run/docker.sock
- /usr/bin/docker:/usr/bin/docker
- /usr/libexec/docker/cli-plugins:/usr/libexec/docker/cli-plugins
- /var/log/orange-runner:/data/orange-runner/
- /sys/fs/cgroup:/sys/fs/cgroup
cgroup: host
pid: host
orange-lxcfs:
image: orangeci/lxcfs:latest
pull_policy: always
restart: always
container_name: orange-lxcfs
network_mode: none
privileged: true
cgroup: host
pid: host
volumes:
- /var/lib/lxcfs:/var/lib/lxcfs:rshared
EOF
# -----------------------------------------------------------------------------
# Pull images and start services / 拉取镜像并启动服务
# -----------------------------------------------------------------------------
docker compose -f "$COMPOSE_FILE" pull
docker compose -f "$COMPOSE_FILE" up -d#!/bin/bash
# =============================================================================
# Script: f-install-binfmt.sh
# Description: 安装 binfmt systemd 服务,实现多架构容器构建支持
# Install binfmt systemd service for multi-architecture container
# build support
# Note: 依赖 Docker 服务已启动,会在服务启动时自动注册 binfmt
# Requires Docker service to be running; automatically registers
# binfmt on service startup
# 包含交叉验证:安装全部架构后反向验证异架构是否正常
# Includes cross-validation: after installing all architectures,
# verifies that foreign architectures work correctly
# =============================================================================
set -eo pipefail
# -----------------------------------------------------------------------------
# Write binfmt.service / 写入 binfmt.service
# -----------------------------------------------------------------------------
cat > /usr/lib/systemd/system/binfmt.service << 'EOF'
[Unit]
Description=binfmt
Requires=proc-sys-fs-binfmt_misc.mount docker.service
After=proc-sys-fs-binfmt_misc.mount docker.service
[Service]
Type=oneshot
Restart=on-failure
RestartSec=10s
# 主服务 / Main service
ExecStart=/bin/bash -c 'docker run --privileged --rm tonistiigi/binfmt --install all && docker run --rm --platform $(arch | sed -e 's/x86_64/arm64/' -e 's/aarch64/amd64/') alpine arch'
Restart=on-failure
[Install]
WantedBy=multi-user.target
EOF
systemctl daemon-reload
systemctl enable binfmt.service
systemctl start binfmt.service
journalctl --no-pager -n35 -u binfmt#!/bin/bash
# =============================================================================
# Script: h-install-docker-plugin.sh
# Description: 从 Docker 官方镜像中提取 docker-buildx 和 docker-compose 到 Docker CLI 插件目录
# Extract docker-buildx and docker-compose from the official Docker
# image into the Docker CLI plugins directory
# Note: 使用 Docker 镜像中自带的插件文件,无需预先下载
# Uses plugin files bundled in the Docker image, no need to
# pre-download
# 插件安装路径: /usr/libexec/docker/cli-plugins/
# Plugin installation path: /usr/libexec/docker/cli-plugins/
# 自动根据当前架构选择对应的二进制文件
# Automatically selects the corresponding binary based on the
# current architecture
# =============================================================================
set -eo pipefail
TARGET_DOCKER_VERSION="27.5.1"
PLUGIN_DST_DIR="/usr/libexec/docker/cli-plugins"
PLUGIN_SRC_DIR="/usr/local/libexec/docker/cli-plugins"
DOCKER_IMAGE="docker:${TARGET_DOCKER_VERSION}-dind"
# -----------------------------------------------------------------------------
# Ensure the plugin directory exists / 确保插件目录存在
# -----------------------------------------------------------------------------
mkdir -p "${PLUGIN_DST_DIR}"
# -----------------------------------------------------------------------------
# Pull the Docker image / 拉取 Docker 镜像
# -----------------------------------------------------------------------------
echo "Pulling Docker image: ${DOCKER_IMAGE}..."
docker pull "${DOCKER_IMAGE}"
# -----------------------------------------------------------------------------
# Create a container from the image and copy plugins
# 从镜像创建容器并复制插件
# -----------------------------------------------------------------------------
CONTAINER_ID=$(docker create "${DOCKER_IMAGE}")
cleanup() {
echo "Removing temporary container... / 移除临时容器..."
docker rm "${CONTAINER_ID}" >/dev/null 2>&1
}
trap cleanup EXIT
echo "Copying docker-buildx from image... / 从镜像中复制 docker-buildx..."
docker cp "${CONTAINER_ID}:${PLUGIN_SRC_DIR}/." "${PLUGIN_DST_DIR}/"
# Ensure plugins are executable / 确保插件可执行
chmod +x "${PLUGIN_DST_DIR}/docker-buildx"
chmod +x "${PLUGIN_DST_DIR}/docker-compose"
echo "Docker CLI plugins installed / Docker CLI 插件已安装:"
ls -lh "${PLUGIN_DST_DIR}/"
echo ""
echo "Verification / 验证:"
docker buildx version
docker compose version#!/bin/bash
# =============================================================================
# Script: g-install-clean-cgroup.sh
# Description: 安装 cgroup 清理定时任务,定期清理残留 cgroup、orphan 挂载和 ifb 网卡
# Install cgroup cleanup scheduled task, periodically clean up
# residual cgroups, orphan mounts, and ifb network interfaces
# Note: 每 10 分钟自动清理一次(通过 systemd timer 实现)
# Automatically cleans up every 10 minutes (via systemd timer)
# 同时清理 containerd 中已被 Docker 回收但仍残留的容器
# Also cleans up containers in containerd that have been reclaimed
# by Docker but still have residual entries
# 同时支持 cgroup v1 和 cgroup v2
# Supports both cgroup v1 and cgroup v2
# =============================================================================
set -eo pipefail
# -----------------------------------------------------------------------------
# Write clean-cgroup.sh / 写入 clean-cgroup.sh
# -----------------------------------------------------------------------------
cat > /usr/bin/clean-cgroup.sh << 'CLEANCGROUP_SCRIPT'
#!/bin/bash
if grep -q cgroup2 /proc/mounts ; then
# clean expired cgroup / 清理过期 cgroup
# links 2 说明只有两个链接 一个是. 一个是父目录中的自身 即没有子目录的..
# links 2 means only two links: one is '.' and the other is itself in the
# parent directory, i.e. no subdirectories
find /sys/fs/cgroup/ -maxdepth 1 -type d -links 2 -mmin +10 -name 'cnb.*.slice' -delete
# clean orphan slice / 清理孤立 slice
for slice in $(systemctl list-units 'cnb*' |grep slice |awk '{print $1}'); do
if [ ! -d "/sys/fs/cgroup/$slice" ]; then
systemctl stop "$slice"
fi
done
# clean orphan mount / 清理孤立挂载
mounts=$(mount | grep cnb- | awk '{print $3}')
for mount in $mounts; do
slice=$(echo "$mount" | grep -oE 'cnb-\w+-\w+-\w+' | sed 's/-/./g').slice
if [ ! -d "/sys/fs/cgroup/$slice" ] && [ -d "$mount" ]; then
umount "$mount"
fi
done
else
find /sys/fs/cgroup/ -maxdepth 2 -type d -links 2 -mmin +10 -name 'cnb*' -delete
# clean orphan mount / 清理孤立挂载
mounts=$(mount | grep cnb- | awk '{print $3}')
for mount in $mounts; do
pipeline_id=$(echo "$mount" | grep -oE 'cnb-\w+-\w+-\w+')
if [ ! -d "/sys/fs/cgroup/memory/$pipeline_id" ] && [ -d "$mount" ]; then
umount "$mount"
fi
done
fi
# clean ifb / 清理 ifb 网卡
veths=$(ls /sys/class/net | grep '\-ifb' | sed 's/-ifb//')
for veth in $veths; do
# 如果源网卡不存在 ifb则删除 / Delete ifb if source network interface does not exist
if [ ! -e "/sys/class/net/$veth" ]; then
ip link delete "${veth}-ifb"
fi
done
ctr_containers=$(ctr -n moby c ls -q)
for container in $ctr_containers; do
if ! docker container inspect "$container" &> /dev/null; then
ctr -n moby c rm "$container"
fi
done
CLEANCGROUP_SCRIPT
chmod +x /usr/bin/clean-cgroup.sh
# -----------------------------------------------------------------------------
# Write clean-cgroup.service / 写入 clean-cgroup.service
# -----------------------------------------------------------------------------
cat > /usr/lib/systemd/system/clean-cgroup.service << 'EOF'
[Unit]
Description=clean cgroup and mount for cnb
[Service]
ExecStart=/usr/bin/clean-cgroup.sh
EOF
# -----------------------------------------------------------------------------
# Write clean-cgroup.timer / 写入 clean-cgroup.timer
# -----------------------------------------------------------------------------
cat > /usr/lib/systemd/system/clean-cgroup.timer << 'EOF'
[Unit]
Description=clean cgroup for cnb every 10min
[Timer]
OnUnitInactiveSec=10m
OnBootSec=10m
OnActiveSec=0
[Install]
WantedBy=multi-user.target
EOF
# -----------------------------------------------------------------------------
# Enable timer / 启用定时器
# -----------------------------------------------------------------------------
systemctl daemon-reload
systemctl enable --now clean-cgroup.timer2. Configure Self-Hosted Build Machines
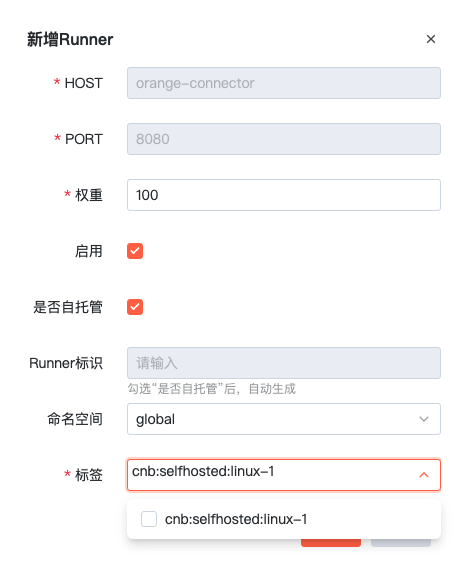
2.1 Create Self-Hosted RUNNER in Admin Console
Note
Tags must start with cnb.
2.2 Connect Self-Hosted RUNNER
Note
① The build node must be able to access the current CNB site domain.
② After creating the Runner, open Connection Guide. For a first installation, click Get one-time enrollment token in the dialog.
③ On Windows, pay attention to script and config file encoding to avoid startup failures caused by hidden extensions or BOM headers.
Linux
- One-Click Setup Script
curl -fsSL https://docs.cnbprod.alpha.qq.com/system-runner/scripts/linux.sh \
  | CONNECTOR_ENDPOINT=wss://connector.cnbprod.alpha.qq.com \
SELF_HOSTED_ID=xxxx-xxxx-xxxx ENROLLMENT_TOKEN=REPLACE_WITH_TOKEN_FROM_CONNECTION_GUIDE bash- Configuration and Storage Directories
Default directories and paths:
① Configuration directory: `/etc/orange-ci`
② RUNNER configuration file: `/etc/orange-ci/runner-config.json`
③ Data storage directory: `/data/orange-ci`

How to modify:
① Modify configuration directory: Configure environment variable `ORANGE_RUNNER_CONFIG_DIR`
② Modify data directory: Configure environment variable `ORANGE_RUNNER_DATA_DIR`.- Other Common Commands
# Install service
orange-runner install
# Start service
orange-runner start
# Stop service
orange-runner stop
# Uninstall service
orange-runner uninstall
# Remove global command
rm /usr/local/bin/orange-runner
# Check service running status
orange-runner status
# View logs
tail -f /data/orange-runner/logs/app.log
Mac
- One-Click Setup Script
curl -fsSL https://docs.cnbprod.alpha.qq.com/system-runner/scripts/mac.sh \
  | sudo env CONNECTOR_ENDPOINT=wss://connector.cnbprod.alpha.qq.com \
SELF_HOSTED_ID=xxxx-xxxx-xxxx bash- Configuration and Storage Directories
Default directories and paths:
① Configuration directory: `$HOME/orange-ci/etc/orange-ci`
② RUNNER configuration file: `$HOME/orange-ci/etc/orange-ci/runner-config.json`
③ Data storage directory: `$HOME/orange-ci/data/orange-ci`
How to modify:
① Modify configuration directory: Configure environment variable `ORANGE_RUNNER_CONFIG_DIR`
② Modify data directory: Configure environment variable `ORANGE_RUNNER_DATA_DIR`.- Other Common Commands
# Install service
orange-runner install
# Start service
orange-runner start
# Stop service
orange-runner stop
# Uninstall service
orange-runner uninstall
# Remove global command
rm /usr/local/bin/orange-runner
# Check service running status
orange-runner status
# View logs
tail -f $HOME/orange-ci/data/orange-runner/logs/app.log
Windows
- One-Click Setup Script
Set-ExecutionPolicy -ExecutionPolicy Unrestricted -Confirm:$False -Force
invoke-webrequest https://docs.cnbprod.alpha.qq.com/system-runner/scripts/windows.ps1 \
  -outfile windows.ps1
$env:CONNECTOR_ENDPOINT='wss://connector.cnbprod.alpha.qq.com'
$env:SELF_HOSTED_ID='xxxx-xxxx-xxxx'
$env:ENROLLMENT_TOKEN='REPLACE_WITH_TOKEN_FROM_CONNECTION_GUIDE'
./windows.ps1- Configuration and Storage Directories
Default directories and paths:
① Configuration directory: `C:/etc/orange-ci`
② RUNNER configuration file: `C:/etc/orange-ci/runner-config.json`
③ Data storage directory: `C:/data/orange-ci`

How to modify:
① Modify configuration directory: Configure environment variable `ORANGE_RUNNER_CONFIG_DIR`
② Modify data directory: Configure environment variable `ORANGE_RUNNER_DATA_DIR`.- Common Commands
# cd to the directory where orange-runner.exe is located
cd $HOME\Downloads\orange-runner
# Start service
.\orange-runner.exe start
# Stop service
.\orange-runner.exe stop
# Uninstall service
.\orange-runner.exe uninstall
# Delete exe file
Remove-Item -Path .\orange-runner.exe
# Check service running status
.\orange-runner.exe status
# View logs
Get-Content 'C:\data\orange-runner\logs\app.log' -Wait -Tail 10
Root-Organization Custom Runners
In addition to system-administrator-managed build nodes, the platform also allows root-organization administrators to self-attach Mac/Windows build machines as resources dedicated to that organization.
1. System Administrator Enables the Toggle
Open Admin Console / System Management / Cloud Native Build / Custom Runner and turn on the Allow Custom Runners toggle.
Once enabled, every root organization gains a Build Nodes entry in Organization Settings, where root-organization administrators can self-attach Runners.
2. Root-Organization Administrator Connects the Build Machine
- Open
Root Organization / Organization Settings / Build Nodes, click+ Add Runner, and fill in name and tags. - The new node starts in the
Offlinestate. OpenConnection Guide, clickGet one-time enrollment token, and copy the generated complete command. The token is valid for one hour; no manual replacement ofSELF_HOSTED_IDor token assembly is required. - Run the script for the matching platform (Mac/Windows) on the target build machine. The node becomes
Onlineonce it successfully connects.
If Connection Guide reports an expired secret or local state.json is lost, click Reset runner and get install command and reinstall with the new command. Do not reuse an old command or token.
When does a reset take effect?
The server caches Runner credentials for up to 5 minutes. Operations such as resetting a Runner or clearing its machine fingerprint take full effect once that cache expires. Until then the original machine may still connect and a new machine may be briefly rejected. This is expected — just wait and retry instead of repeating the operation.
The script content, configuration directories, and common commands are identical to those described in Connect Self-Hosted RUNNER above.
3. Scheduling in .cnb.yml
See the user-side documentation Build Node - Root-Organization Custom Runners.
Limitations
- Only Mac and Windows build machines are supported; Linux self-hosted nodes are still attached by the system administrator.
- The custom build machine must be able to reach the CNB site (for node registration, heartbeat reporting, pulling pipeline tasks, and uploading logs/artifacts). If the machine sits on an internal network, make sure the required egress policy is in place.
- Custom Runners do not enable Docker by default:
runner.cpushas no effect, and image-based build environments cannot be used. - For Cloud Native Build only; cannot be used for Workspaces (remote development) tasks.
- Advanced capabilities such as scoping a Runner's allowed groups/projects and certificate placement are identical to system-level self-hosted Runners.
FAQ
Linux Build Machines
- When building multi-platform images with
docker buildx, building ARM images fails with:Error while loading /usr/sbin/dpkg-split: No such file or directory
Solution:
docker run --rm --privileged multiarch/qemu-user-static --reset -p yes --credential yesgit cloneworks on the host but times out in pipeline containers.
Cause: IPv4 forwarding must be enabled. cat /proc/sys/net/ipv4/ip_forward should return 1. If not enabled, edit with the following command:
Self-Hosted Build Machines
- When is it appropriate to use self-hosted RUNNER?
- Build requirements for Windows and Mac.
- Network requirements where CNB-provided build machines cannot access your network, but self-hosted machines can access the target network.
- What can self-hosted runners do? What can't they do?
- Can only run commands on bare metal.
- Can only run CI tasks.
- Cannot run remote development tasks.
- Can self-hosted RUNNER usage be restricted to specific repositories and organizations to prevent machine abuse?
{
  "allowUseThisRunner": {
    "groups": [],
    "projects": []
  }
}
Add this configuration in runner-config.json, using exact comparison. If it doesn't meet expectations, check the runner's logs.